 Pin This
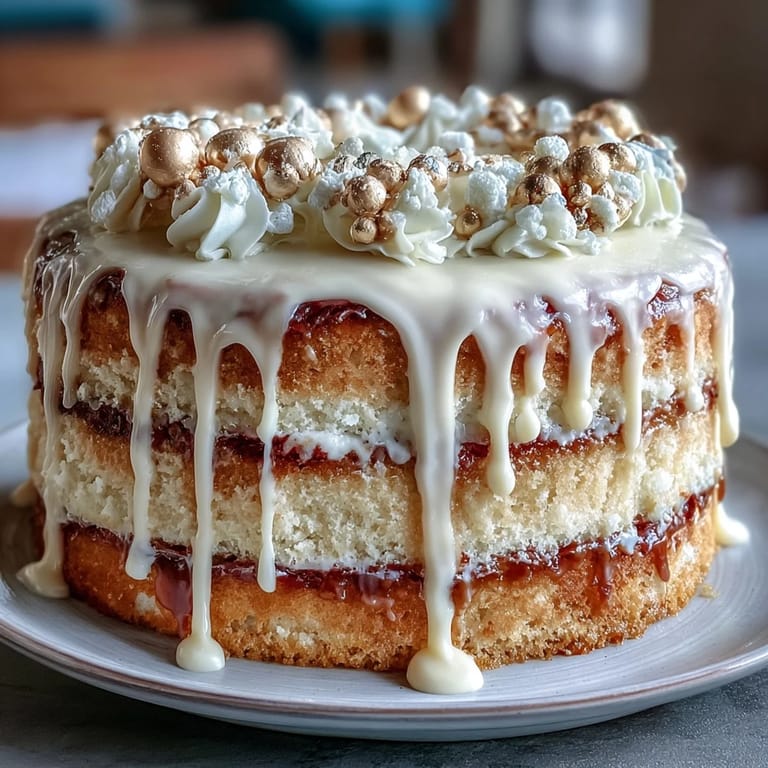
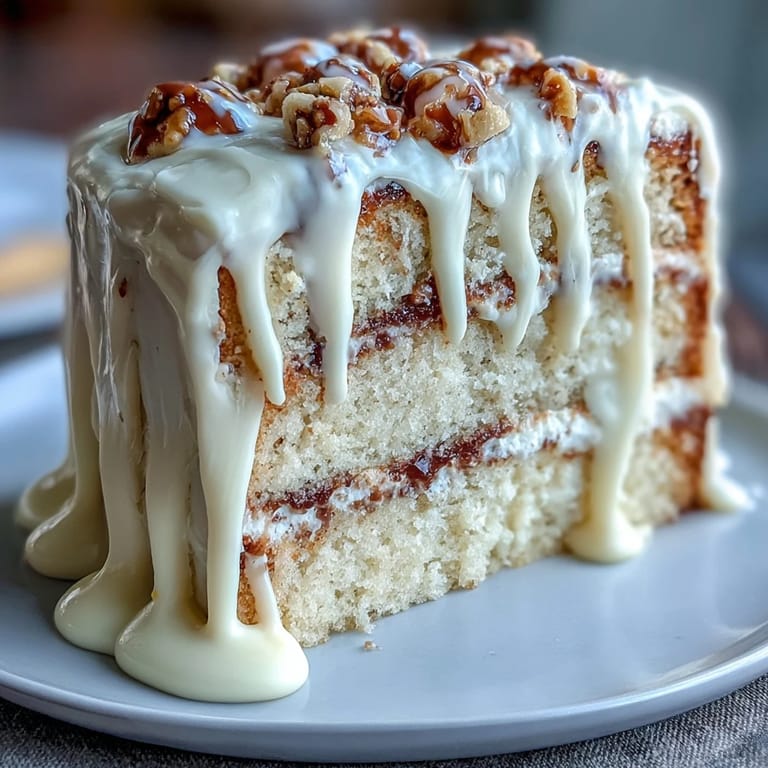
 My sister called me three weeks before her graduation, voice trembling with excitement, asking if I could make something that felt as momentous as the occasion itself. I found myself standing in the kitchen at midnight, sketching cake designs on the back of an envelope, when it hit me—white chocolate drip, gold accents, something that looked like celebration itself. That cake became the centerpiece of her party, and watching people gasp when they saw it made me realize that sometimes the most meaningful dishes are the ones we create specifically for people we love.
I'll never forget my best friend's face when she walked into the room and saw this cake sitting on the dessert table, golden accents catching the light. She actually cried, which felt like the highest compliment a baker could receive. That's when I understood—it's not just about the technique or the ingredients, it's about what the cake represents to the people gathered around it.
Ingredients
- All-purpose flour (2 ½ cups): Make sure it's fresh and stored properly, because stale flour makes cakes dense and disappointing.
- Baking powder (2 ½ tsp): This is what gives the cake its tender crumb, so don't skip it or reduce the amount thinking it won't matter.
- Salt (½ tsp): Sounds tiny, but it enhances the vanilla and keeps everything tasting balanced rather than flat.
- Unsalted butter (1 cup for sponge, 1 cup for buttercream): Room temperature is non-negotiable here; cold butter won't cream properly and you'll end up with a dense cake.
- Granulated sugar (2 cups): The creaming stage is where magic happens, so give it the full three minutes until the mixture looks pale and fluffy.
- Large eggs (4): Room temperature eggs blend seamlessly into the batter, creating a silky texture that cold eggs simply won't achieve.
- Pure vanilla extract (1 tbsp plus 1 tsp): Real vanilla makes a noticeable difference in flavor depth, and this is not the place to save money with imitation.
- Whole milk (1 cup): Room temperature milk prevents seizing and ensures even distribution throughout the batter.
- White chocolate (6 oz for drip, 6 oz for buttercream): Quality matters tremendously here because cheap white chocolate tastes waxy and artificial.
- Powdered sugar (4 cups): Sift it before using to avoid lumpy, grainy buttercream that no amount of beating will fix.
- Heavy cream (2-3 tbsp for buttercream, ¼ cup for drip): This is what transforms the buttercream from stiff to silky and makes the ganache pourable.
- White chocolate crispy pearls or malt balls (1 cup): These become the base for your gold balloons, creating height and visual drama on top.
- Edible gold spray or luster powder: A little goes a long way, and applying it in a well-ventilated area prevents you from inhaling sparkle particles.
Tired of Takeout? 🥡
Get 10 meals you can make faster than delivery arrives. Seriously.
One email. No spam. Unsubscribe anytime.
Instructions
- Prepare your workspace:
- Preheat the oven to 350°F and grease those three 8-inch round pans thoroughly, then line them with parchment paper. This double protection ensures your cake slides out cleanly without any heartbreaking sticking.
- Build the dry foundation:
- Whisk together flour, baking powder, and salt in a medium bowl, breaking up any clumps as you go. Set this aside because you'll be alternating it with the milk, and having it ready prevents the mixer from running while you scramble.
- Cream the butter and sugar:
- Beat the room-temperature butter and sugar together for about three minutes until the mixture transforms into something pale, fluffy, and noticeably lighter in color. This is where the cake's tender crumb begins, so don't rush it or skip ahead thinking it's done early.
- Incorporate the eggs:
- Add eggs one at a time, beating after each addition so they fully incorporate rather than creating an oily, separated batter. After all four eggs are in, pour in the vanilla extract and mix until everything is glossy and smooth.
- Alternate flour and milk:
- Reduce the mixer to low speed and add about one-third of the flour mixture, then half the milk, then another third of flour, then the remaining milk, and finally the last of the flour. This alternating method prevents overmixing and keeps the batter tender, so don't skip steps or combine them together.
- Bake the layers:
- Divide the batter evenly among the three pans and smooth the tops gently, then bake for 30 to 35 minutes until a toothpick inserted in the center comes out clean. The kitchen will smell absolutely divine, but don't open the oven door constantly because you'll lose heat and potentially end up with an undercooked center.
- Cool and rest:
- Let the cakes sit in their pans for exactly 10 minutes, then turn them out onto wire racks to cool completely at room temperature. This cooling period is when the structure sets properly, so rushing this step leads to crumbly cakes that fall apart when you stack them.
- Make the buttercream base:
- Beat the room-temperature butter until it's completely smooth, then gradually add the sifted powdered sugar in batches, mixing well between each addition. This gradual approach prevents powdered sugar from flying everywhere and ensures there are no lumps hiding in your frosting.
- Add the white chocolate:
- Pour in the melted and cooled white chocolate along with vanilla extract, salt, and two tablespoons of heavy cream, then beat everything on medium-high speed until light, fluffy, and noticeably paler than when you started. If it seems too stiff, add another tablespoon of cream, but go slowly because you can always add more but you can't take it out.
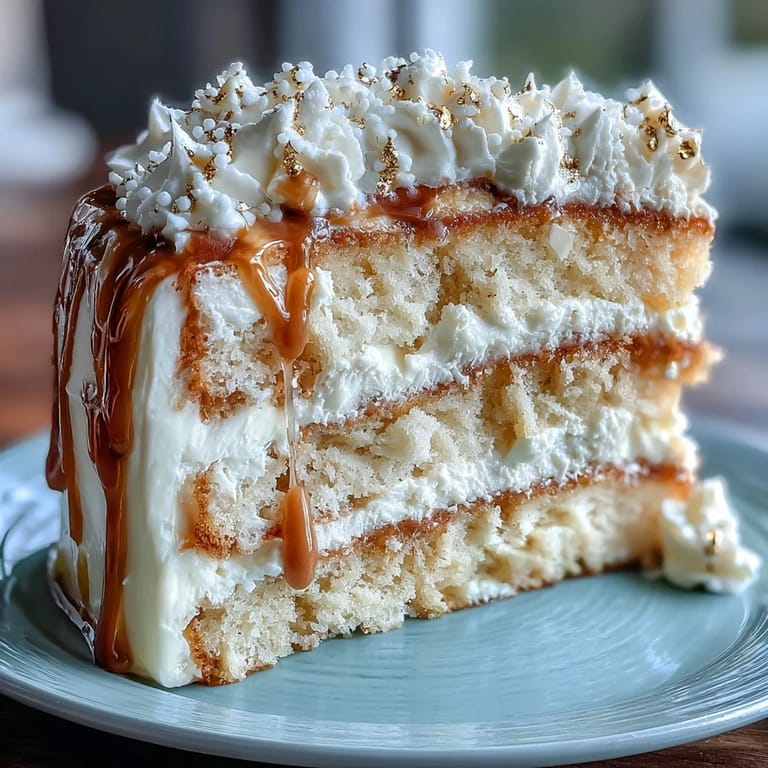
- Layer and crumb coat:
- Level the cooled cakes if the tops have domed, then place the first layer on your serving plate and spread a thin, even layer of buttercream on top. Repeat with the remaining layers, then cover the entire cake with a thin crumb coat of frosting and pop it in the refrigerator for 30 minutes so the crumbs seal down.
- Apply the final frosting:
- Spread a thick, generous coat of buttercream over the chilled cake, smoothing the sides with an offset spatula dipped in warm water and the top until it's as even as you can make it. This doesn't need to be perfectly pristine because the drip will cover any imperfections.
- Create the white chocolate drip:
- Heat the heavy cream until it just barely simmers, then pour it over the chopped white chocolate and let it sit undisturbed for one minute before stirring until completely smooth. Cool this ganache to room temperature, which usually takes about five to ten minutes, before using it so it drips elegantly rather than running all over the place.
- Drip and fill:
- Using a spoon or squeeze bottle, create dramatic drips around the top edge of the cake by letting the ganache cascade down the sides, then fill the center with more ganache and smooth it to match the frosting. Work slowly and patiently because rushed drips look sloppy, while deliberate ones look intentional and gorgeous.
- Prepare the gold balloons:
- Spray the crispy pearls or malt balls with edible gold spray in a well-ventilated area, or roll them in luster powder for a more subtle sparkle effect, then let them dry completely. Once dry, insert toothpicks or thin cake wires into the bottom of each piece and arrange them in a festive cluster on top of the cake.
- Final chill and serving:
- Refrigerate the finished cake until you're ready to serve it, but bring it to room temperature for about 30 minutes before slicing so the flavors fully shine. Cold cake tastes muted and dense, while room-temperature cake reveals all the vanilla and white chocolate beauty you worked so hard to create.
 Pin This
 I made this cake for my colleague's graduation last spring, and what stuck with me wasn't just the compliments, but the way the birthday girl asked for the recipe to make it for her own sister. Watching my creation inspire someone else to bake felt like the cake had done its job perfectly—it had marked a milestone and started a new tradition.
The Science Behind the Tender Crumb
The vanilla sponge works because of the creaming method, where butter and sugar are beaten together to incorporate air throughout the batter. Those tiny air bubbles expand when heat is applied, creating the light, tender crumb that makes every bite feel special. I learned this the hard way when I tried to speed up the process once and ended up with a dense, heavy cake that tasted like sadness. The three-minute minimum for creaming isn't arbitrary—it's the time required to actually achieve that pale, fluffy texture, and skipping it shows in the final result.
White Chocolate: Quality and Melting Techniques
White chocolate is finicky and burns easily because it contains no cocoa solids to protect it during melting, so always use the gentle heat method of a double boiler or melting in short bursts in the microwave. I discovered the hard way that microwaving white chocolate in 30-second increments with stirring between each pulse prevents those scorched, seized clumps that ruin both buttercream and ganache. Let it cool slightly before folding into the buttercream, because adding warm white chocolate can cause the butter to separate and create a grainy, broken texture that's nearly impossible to fix.
Decorating with Confidence and Grace
The gold balloons look spectacular but require patience during the application stage, so give yourself time and don't rush the assembly on the day of serving. You can actually prepare the golden crispy pearls a day or two ahead, which takes pressure off your decorating day and lets you focus on arranging them beautifully. This cake is forgiving enough that small imperfections in the drip or positioning actually add to the handmade charm rather than detracting from it.
- Store the finished cake in the refrigerator for up to three days, and always bring it to room temperature before serving for the best flavor and texture.
- If you're transporting this cake, keep it in the refrigerator during travel and position it carefully so the gold balloon decorations don't shift or break.
- Leftovers are just as delicious on day two or three, and the flavors actually deepen slightly as the vanilla infuses throughout the cake.
 Pin This
 This cake has become my go-to celebration dessert because it's both achievable and memorable, turning an ordinary gathering into something people will talk about for years. Bake it with intention, frost it with patience, and watch the magic happen when you finally place those golden balloons on top.
Frequently Asked Questions
- → How do I achieve a smooth white chocolate drip?
Heat heavy cream until just simmering, then pour over finely chopped white chocolate. Let it sit for a minute before stirring gently until smooth and glossy for perfect drizzle consistency.
- → Can I prepare the sponge layers in advance?
Yes, bake the vanilla sponge layers ahead and wrap them tightly. Store in the refrigerator to maintain freshness, then bring to room temperature before assembly.
- → What is the best way to decorate with gold balloons?
Spray white chocolate crispy pearls or malt balls with edible gold spray or dust with gold luster powder, then attach securely using toothpicks or thin wires for an elegant cluster.
- → How do I keep the buttercream light and fluffy?
Beat room temperature butter thoroughly before gradually adding sifted powdered sugar. Incorporate melted white chocolate and cream carefully, adjusting amounts to reach a smooth and airy texture.
- → What serving suggestions complement this cake?
Pair with sparkling wine or a festive cocktail to enhance the celebratory experience without overpowering the delicate flavors.